The Print to IMS feature is a helpful tool for inserting one or multiple electronic files at a time.
If you have an electronic file or multiple electronic files needing importation within a new IMS record, you may want to use the Save To IMS feature (click to learn more). If you have some type of electronic file that you are currently working on or rather only select certain pages within the file for creating a new document to be automatically sent into IMS, this Print To IMS feature would be the best fit.
Working with spreadsheets (MS-Excel), word processors (MS-Word), PowerPoint, CAD, pictures, text files, or any other program that allows you to select the option to print, you can now use this Print To IMS feature for printing directly into IMS. This feature would eliminate the need to save the file if desired, and only print the file directly into a new record within IMS. Another possible reason to use this feature might be that you want to choose certain pages within the file to be sent to IMS.
NOTE: Certain programs may have a default printer option, hindering you from performing this feature. One program in particular, Microsoft Outlook, will allow you to print the email itself to IMS; but may print any attachments within the email to the default printer. In this case, you will possibly need to change your default printer to be the virtual IMS Printer (possibly consult with your IT department).
Print To IMS
To start, you simply open the desired program you would like to print or send to IMS. The particular program you choose to print from, may have different methods to start the printing process. Most programs either have a printer icon (button) or under the file menu, choose the print option.
You should now see the Microsoft Windows options to select any printers you currently have installed on your computer.
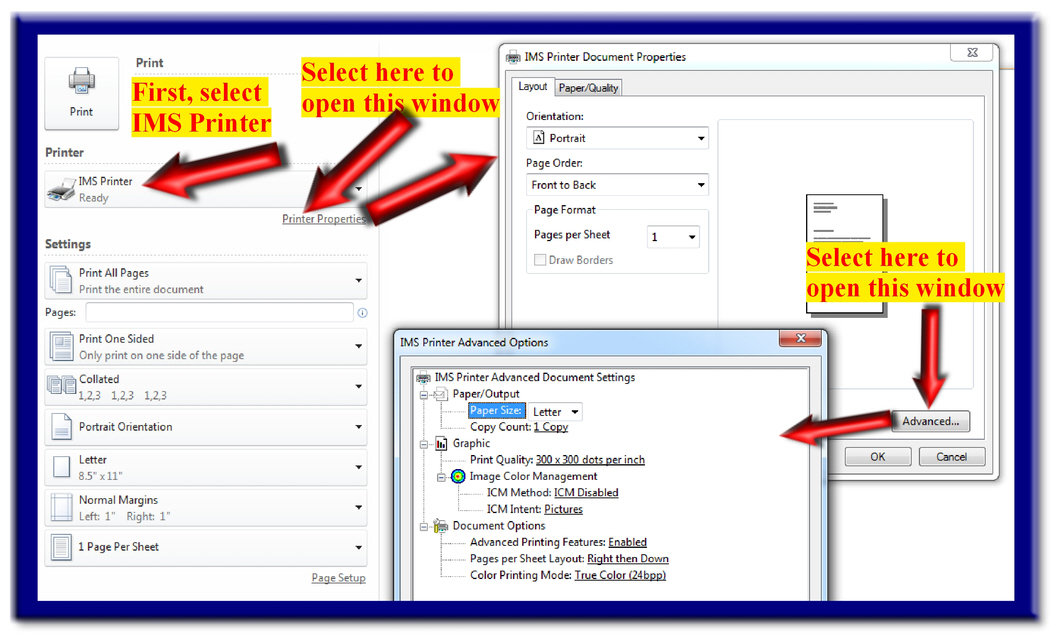
You will now choose the "IMS Printer".
Although the IMS Printer is a virtual printer and not a real printer with ink or toner for printing onto paper, your computer does not know the difference. You may customize or choose additional printing options if desired. Choose the "Printer Properties" button offering things like quality, black/white or color, and portrait or landscape type features. You can again select the "Advanced" button within the "Printer Properties" window for selecting even more features such as size of paper, dpi (quality), and more. Once you have made any changes, you again have the final options of selecting how many pages, which specific pages you want printed, and so on.
NOTE: This below screen shot may not look the same on your computer, but should either look similiar or offer similiar type features if using the Microsoft Windows Operating System.
Once you have selected the "IMS Printer," then select the "Print" button to begin the process.
The IMS Wizard is now launched. Follow the below instructions:
FIRST
Enter your user name and password and select the "Next" button.

Second
Select from the drop down which Profle you want to send this electronic file to and select the "Next" button.

Third
You will now see a section labeled "Record Details." Within this section you will see your specific index fields relative to your chosen profile. You may now enter any, all, or no details within your index fields and select the "Next" button.
NOTE: You will also see a drop down option for the "Profile" allowing you to change to a different profile, incase you accidently selected the incorrect profile within the previous section of the wizard.

Fourth
This section of the IMS Wizard allows you to again add one or more attachments.
Select the "Add New" button and the Microsoft Window will launch, allowing you to choose the file within a folder on your computer or server. Once finding the folder of choice, you may then choose only one file or drag your mouse over any or all files within the folder to be inserted (attached).
You may choose to repeat this step by again selecting the "Add New" button and choosing a different or additional folders of choice.
Once you have inserted all attachments desired, you can now select the "Next" button.

Lastly
To conclude this IMS Wizard process, you will need to review the contents within the "Records Details" to ensure all steps conducted within the IMS Wizard are correct.
At any time you may select the "Back" button to correct, change, or add.
Once you are satified with your results, select the "Finish" button.
All the attachments may now be found within your database profile for viewing.

NOTE: If you liked this feature (IMS-Wizard, Print to IMS), then you will most likely want to use this almost exact feature when saving electronic files to IMS. See below the "Save To IMS" section of this Help Center.