Home > Advanced Functions > Enterprise 4.0 > Bar Code
Bar Code
One of the most simplistic forms of automating processes is to implement bar codes into your documents. Barcodes are nothing more than a type of character font, just as you would choose Times New Roman or Arial. You can download free fonts from a trusted site or purchase them for more flexibility in size or design. Bar codes can be generated using a web site barcode generator, barcode software, MS EXCEL, MS WORD, and others. We also provide software programs (3rd Party) that can implement bar codes into non-flexible environments that currently restrict any change or addition to documents, digital files, and other data sources. Do not be fearful using bar codes, once you implement at least one you will find how incredibly simple it can be.
The barcode does not have to be present on the actual document being scanned; it may be on any sheet within the documents, or most commonly, on a cover sheet. Although IMS can read barcodes within hundreds of pages, the bar code must be consistently placed on the same page within the same area on that page, to be detected. You may have as many barcodes as you have index fields. Please note that if choosing to bar code the date field, you must be consistent with the format style, and if possible compliment the date style within IMS (ie: 1/15/2009). The date field can be tricky for most barcodes and would probably be best to avoid.
You may also find that some barcodes, especially the free barcodes, will not allow spaces in between words or characters, if this is a problem you can try using a dash or underscore for spacing. You can also purchase barcodes that can be very flexible.
The Process
We have made improvements with our barcode process.
If a barcode is missed for whatever reason, IMS will start back to the beginning page, looking over page by page from top to bottom. IMS will count in chronological order to find this barcode. There is a chance the barcode IMS finds, still could be inaccurate. A teal (~) will be placed at the end of the barcode content. In addition to placing a teal, this document will also be sent to the Index feature for final approval. In the Index feature, you may remove the teal at the end of the content if it was in fact correct or replace the content; and then select the "Update" button.
Example: A 10 page document has one barcode to read on each page for pages # 1-4 and the very last page # 10 (5 total barcodes). IMS reads all barcodes except the 4th page. Once the barcode is read on the 10th page, IMS will return to the first page. IMS will look for the missing 4th barcode in chronological order. After again reading the 3rd barcode on the 3rd page, IMS will begin searching top to bottom of each page thereafter, until finding the missing 4th barcode. This barcode could have been a sticker, and the individual pasting the barcode on the sheet either put it on the wrong area of the 4th page or maybe it was placed on the back of the 4th page, which would be the 5th page. Even if this barcode was on the 9th page, it can be found and placed within the proper index field with a teal (~) at the end. This document will now be found within the Index feature for final approval.
If all barcodes were read correctly, the document will be sent to the proper Profile database with no need for final approval within the Index feature.
STEP 1
Open the Import Module. Start Menu, All Programs, Imminent Technologies Inc., IMS Import. (see arrow 1)
STEP 2
Double click the Import icon within the task bar of your Desktop. (see arrow 2).
STEP 3
Select the "Configure" button (see arrow 3).
STEP 4
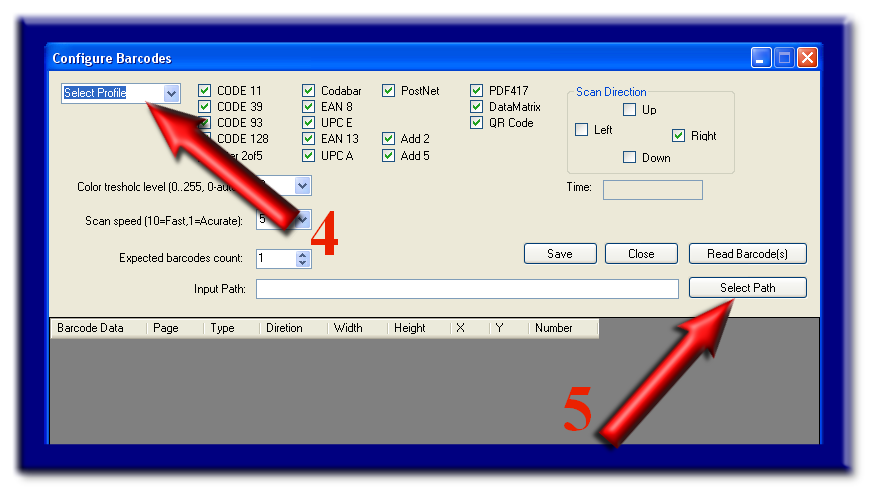
Select your Profile from the drop down menu (see arrow 4)
STEP 5
A folder is automatically created for each Profile by IMS for using the import feature, or you may create a new folder (see Multiple Configurations bellow for more details).
NOTE: Once you select the profile (from Step 4) the path will be automatically populated. You can change it if needed.
Select the "Select Path" button (see arrow 5). Navigate to the folder designated for digital files to be deposited.
STEP 6
You now need to place the document(s) with barcodes into the selected folder from the previous step. Either you have these documents in digital form and save to this folder, or scan the documents in to be saved or copy/paste into this folder. You may also use the Batch Scan Module if desired.
Batch Scan Module Process:
A) Scan the barcoded documentation
B) Make any changes necessary (orientation, reorder of pages, etc.)
C) Select the profile
D) Select or arrow down to the last page on the list
E) Select the "Make Docs" button
DONE
NOTE: If you have more than one document containing barcodes, you can try to scan them all in at once. You could run into issues if any of the barcodes are within the same position on the page or if you have multiple barcodes that share the same index fields. (see Multiple Configurations below for more information).
STEP 7
Select any of the following setting:
- Arrow 6 You should probably know which barcodes you have used, select all that apply. If you are not sure, you may select all barcode types. If selecting all barcode types, it could take much longer when scanning the pages, especially if multiple pages are involved.
- Arrow 7 Feel free to tweak these settings or leave in their default options. You do not have to know how many barcodes are involved, but if you select a higher number than what you actually have, the initial search process could take a little longer to complete. If you are confident the barcodes will be laser quality and of sufficient size, feel free to set the scan speed to a faster number.
- Arrow 8 Select the Barcode orientation for all the different directions the barcodes read. If not sure about all the directions, select all 4 possibilities. If selecting all 4 Scan Directions, this could increase the scanning process.
STEP 8
Select the "Read Barcode(s)" button (see arrow 10)
Depending on how many documents are involved and how many settings were checked, this process could take several minutes.
After this process is complete and all barcodes were detected, you may review the clock time (see arrow 9).
STEP 9
Check to make sure all barcodes were detected within the bottom window (see arrow 14).
If you noticed any missing barcodes, you may want to tweak your settings within Step 7, especially try slowing the scanning speed down (see arrow 7). Select the "Read Barcode(s)" button again, to perform the newly refined barcode search.
If you are stilling having issues, please contact your IMS Authorized Reseller Support Center for additional help.
STEP 10
Now that you have successfully detected all barcodes, you will want to uncheck any irrelevant options, especially if you need to increase the clock speed of the scan. You will find information within the different columns that will answer any questions you might have as to what barcode types are involved or the direction of the barcode (see all arrows from 11-13).
STEP 11
You will now want to match the barcode with the index fields. By selecting the drop down option (see arrow 16) you will see a list of options appear (see arrow 15), which are the field names within this Profile.
STEP 12
Lastly, select the "Save" button (see arrow 17).
You may now proceed to creating barcodes for additional Profiles (see arrow 4) or to close the program select the "Close" button located to the right of the "Save" button (see arrow 17).
STEP 13
Double click the Import icon within the task bar of your Desktop. (see arrow 2).
STEP 14
Select the "RUN" button to left of the "Configure" button (see arrow 3).
After you configure barcodes or an Import process and close the barcode/import screen, the smaller import window will still be open. Just click run from there.
Anytime the import icon is visible in the taskbar, import is running. Import has 3 states (1) visible for configuring,(2) running, and (3)closed.
Finished
NOTES:
Any digital file type deposited within this folder will be pulled into the specified Profile. Import will first look for an XML file which stores the indexing content (metadata) and then look for it's digital file to import. All other files that do not have an XML file along with it, will first be searched for any bar codes (if applicable). Regardless if bar codes are configured or not (if barcodes are not setup for that profile they will not be read), if no bar code is detected and there is not XML file for the digital file, it will simply be deposited within IMS with all index fields left empty or blank.
Multiple Configurations
If you are in need of importing multiple variations of digital files, you will need to be creative in your design. Lets say you have a Profile needing several different bar code scenarios and possibly a few different types of scripts written for text extraction within the digital files. You could create a folder naming it the Profile name along with the Scenarios’ name (ie: HR Employee App Barcode 1, HR Employee App Barcode 2, HR Employee Evaluation Script1, HR Employee Script 2, etc.). Once you have created the folders, follow the process above (steps 1-7) for each scenario. If running a script, you would need to have the script perform it's process and then send the digital file along with it's XML file to any of the folders you have created for your profile.


See also